

Selber machen - Anleitung
Kayak im Grönland Stil - Tuch auf Holzrahmen
Autor: Wolfgang Brinck, skin on frame kayak builder since 1987, 1701 Monarch St, Alameda, CA 94501
Cell-Phone +001 510-846-5488, Web-Site
Quelle: www.instructables.com, Lizenz
Übersetzung: Ruedi Anneler, Büren an der Aare, Schweiz
Inhalt
Diese Anleitung zeigt Ihnen, wie Sie ein 5.6 Meter langes Groenland-Kajak selbst bauen können, das nur zwischen 15 und 20 Kilogramm wiegt und dessen Material um die 300 Schweizer Franken kostet. Leicht und günstig im Vergleich zu einem kommerziell hergestellten Kunststoffboot, das zwischen 25 und 30 Kilogramm wiegt und für das Sie zwischen 1'000.- und 3'000.- Franken auslegen müssen.
Produkt


Das Groenland-Kajak ist eines der vielen verschiedenen arktischen Bootsdesigns, die mittels der Haut-auf-Rahmen Technik gefertigt werden. Bei dieser Technik bauen Sie durch zusammenstecken und zusammenbinden von Holzstücken einen leichten Rahmen, der anschliessend mit einer Haut überzogen wird. Als Resultat erhalten Sie ein Boot, das leicht und trotzdem stark ist.
Die reine Bauzeit beträgt beim erstmaligen Bau eines solchen Boots um die 100 Stunden. Dazu kommt die zeit für die Beschaffung des Materials. Da diese Instruktion zeimlich lang ausgefallen ist, habe ich sie in mehrere Abschnitte unterteilt.
Nebst den Angaben zu Begriffen, Werkzeugen und material umfasst sie die folgenden Abschnitte
- Gunwales herstellen
- Deck bauen
- Kiel, Bug und Heck hinzufügen
- Rippen hinzufügen
- Rumpf- und Deck-Verbinder hinzufügen
- Haut aufnähen und lackieren
Der Haut-auf-Rahmen Bau ist einfach. Er erfordert weder spezielle Werkzeuge noch ausgezeichnete Holzbearbeitungskenntnisse. Die arktischen Bootsbauer sind zuerst und vor allem Jäger, und erst in zweiter Linie Bootsbauer. Jeder baut hier sein Boot selbst. Es gibt keine professionellen Bootsbauer, was dazu beiträgt, dass die zum Bau verwendete Technik auf einm Niveau liegt, das jedem zugänglich ist.
Sobald Sie erst einmal Ihr erstes Haut-auf-Rahmen Boot gebaut haben, werden Sie dabei genügend Kenntnisse erworben haben, um andere Haut-auf-Rahmen Boote mit einem anderen Design oder Stil aufgrund von Zeichnungen bauen zu können. Solche Zeichnungen sind unter anderem auch auf David Zimmerly's Web Site zu finden.
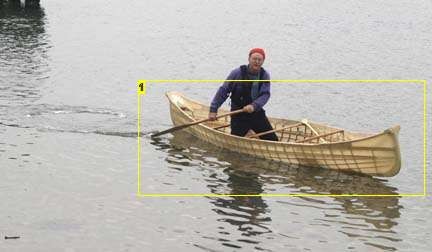
Aber Sie mit dieser von Ihnen neu erworbenen Technik auch in der Lage, nahezu jedes Kleinbootdesign zu bauen. Ich habe zum Beispiel den nachstehend abgebildeten offenen Kanadier mit dieser Technik gebaut. Das Original dieses Boots war ein Ojibwa Birkenrindenkanu.
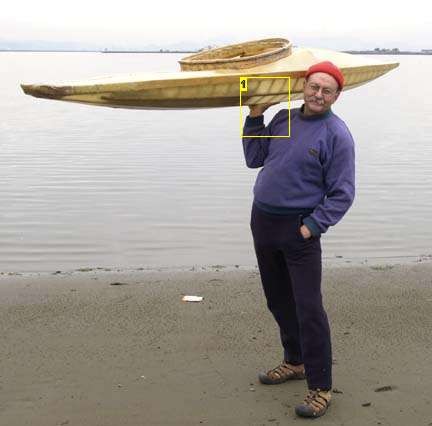
Oder Sie können ein sehr kleines, superleichtes Boot bauen, das mit seinen nur 10 Kilogramm bequem mit nur einer Hand getragen werden kann.
Mehr Bilder von Kajaks auf dem Wasser finden Sie auf der Qajaqusa Web-Site.
Begriffe
Bootsteile haben Bezeichnungen, die möglicherweise nicht allen geläufig sind. Hier eine Liste solcher Begriffe zum besseren Verständnis der Bauanleitung. Die Bilder zeigen, wo die Teile am Boot zu finden sind.
Audio Dateien mit der Aussprache der Begriffe finden Sie hier.
| Bezeichnung | Definition |
| Gunwales | Ausgesprochen "gunnels" Gunwales sind die zwei Bretter, welche den äusseren Rand des Decks formen. |
| Risers | Dreieckige, mit Holzzapfen mit den Enden der Gunwales verbundene Holzstücke. Sie erhöhen die Enden des Bootsdecks, damit es sich an Bug und Heck nach oben schwingt. |
| Kielson | Diese Leiste verläuft in der Mitte des Rumpfs auf der Unterseite des Boots. Der Kielson verläuft innerhalb des den Rahmen überspannenden Tuchs. Verläuft er ausserhalb dieser Bespannung, dann nennt man ihn Kiel. |
| Rumpf-Streben | Lange, schmale Holzleisten, die parallel zu den Gunwales und auf halber Höhe zwischen diesen und dem Kielson längs am Rumpf verlaufen. Diese Streben halten das den Bootsüberzug von den Rippen fern. |
| Rippe | Hauptstruktur-Element des Rumpfs. Ihre Formen definieren Form und Eigenschaften des Rumpfs. |
| Bug Brett | Ein Brett, das den Kielson und die Gunwales an der Spitze des Boots verbindet. |
| Masik | Gebogene Deck-Strebe. Unterstütz den vorderen Rand der Sitzluke. Es gibt Boote, die sowohl Masik als auch eine Kniestütze haben. Andere Boote kombinieren beide Funktionen in einer einzigen Deck-Strebe. |
| Kniestütze | Gebogene Deck-Strebe. Befindet sich genau hinter den Kniescheiben der angewinkelten Beine des Fahrers. Ermöglicht das Verspannen des Fahres im Boot mit den Knien. |
| Fuss-Stütze | Die vierte Deck-Strebe von vorn. Hier werden die Füsse abgestützt. |
| Rücken-Strebe | Die Deck-Strebe, an die sich der Fahrer mit dem unteren Rücken anlehnt. Diese Strebe stützt ausserdem dan Süllrand. |
| Deck-Streben | Bretter zwischen den Gunwales. Halten die zwei Gunwales im richtigen Abstand zueinander. |
| Deck-Verbinder | Paare von schmalen Brettern, die den Zwischenraum zwischen den Deck-Streben vor und hinter der Sitzluke verbuinden. Sie sind die Unterlage für auf dem Deck mitgeführte Gegenstände. |
| Deck-Leinen | Vor und hinter der Sitzluke kreuzweise über das Deck verlaufende Leinen zum Befestigen von Gegenständen auf dem Deck. |
| Süllrand | Ausstülpung am oberen Rand der Sitzluke zum Einhängen der Spritzdecke. Dies Spritzdecke verhindert das Eindringen von Wasser ins Boot bei hohem Wellengang oder bei einer Kenterung. |
Werkzeuge
You will need relatively few tools to build a kayak. Although you can build a kayak entirely with hand tools, access to power tools makes the job go faster but is not essential. On the other hand, nowadays lots of power tools are cheaper than good hand tools. Your choice. Garage sales are a good source of wood working tools, especially hand tools. I have illustrated some of the less common tools below.
Saw horses
You will need two saw horses to build your boat on. Folding ones are easier to store, but you can make your own out of two by fours.
Tape Measure
Your tape measure should be at least 20 foot long. Though the common length seems to be 25 foot.
Block plane
A block plane is used to smooth the edges of boards and also to round edges and shape pieces of wood. This small short plane can be used with one hand while the other hand holds on to the piece of wood. Bigger planes require two hands and are not nearly as useful.
Chisels
You will need these to create the rectangled mortises for the ribs in the gunwales. You need at leat one with a width of 1/4 inch. Chisels are useful only when rellay sharp.
Clamps
Some 2 inch spring clamps are handy for temporarily holding parts together. You can mail order these for about a dollar a piece. Two bar clamps with a 12 inch opening are handy for clamping stuff to your sawhorses so it doesn't move around while you are sawing or drilling on it.
Combination square
You will need this tool for marking right angles. The edge of the flat bar is also handy for
drawing straight lines.
Drill
You will be drilling a fair number of holes.
A battery operated drill is handy, because you are not tripping over cords. They are also cool because you can use them one handed and use your other hand to hang on to the thing you're drilling. Hand drills take two hands to operate. The downside of the cordless drills are the batteries. Once they go out the drill becomes worthless and one new replacement battery typically costs more than half of what the drill with two batteries and a charger cost originally.
An electric drill with a cord will work too along with an extension cord to let you reach all parts of the boat.
You can also use a hand drill if you can find one.
Drill Bits
You will need the following drill bits.
- 1/4 inch for drilling rib mortises if you are not using a router.
- 15/64 inch for drilling doweling holes for 1/4 inch dowels.
- 19/64 inch for drilling doweling holes for 5/16 inch dowels.
Hammer
You will need a claw hammer to pound dowels into holes and to pull nails used to temporarily hold boat parts together. A light weight hammer with a 12 or 16 oz head is fine. You do not need a heavy carpenter's framing hammer for your boat.
Hand saw
You will need a hand saw to trim pieces of wood to length. A Japanese saw cuts at the pull stroke, and this is highly recommended - much easier to create a straight cut with this than with a conventional saw cutting on the push.
Jig Saw
This is a pretty handy tool and can be used for cutting curved shapes such as your kayak bending form or the curved deck beams. The downside is that it cuts on the upstroke and pulls up sawdust and wood splinters which obscure the line that you are trying to cut to. So it's not a precision instrument. There's not much curved line cutting on a kayak, so this saw is not real essential, but still handy to have.
Knife
You will need a knife for cutting string and dowels. It should be a knife with a fixed blade. If it is a folding knife, the blade should lock. Folding knives without a blade lock are dangerous since they want to fold up on your fingers while you are using them.
Rip saw
A rip saw is a hand saw that is used to do long cuts along the length of a board. You can do everything you would do with a circular saw though more slowly and with less noise. They also take some practice before you can make straight cuts, but they don't require electricity.
Sewing needles
You will need a straight and a curved needle for sewing on the skin. Curved needles are the same kind as used for upholstery. The straight needles are about 3 inches long and have a fairly large eye for heavy thread.
Spoke shave
Spoke shaves are handy for quickly rounding the sharp edges of boards. They are also useful for shaping curved deck beams. Buy a good quality one. Avoid cheap Chinese imitations. This is not a slam on the Chinese but rather on the people who have them manufactured overseas and don't do quality control. The problem with bad imitations is that the blade sits at the wrong angle and the sole is ground to the wrong shape so instead of smoothly removing wood, that bad imitations gouge or tear at the wood.
Table saw or circular saw
You will need one of those for cutting wider boards into narrower boards. Table saws are fairly expensive and if you don't have one, don't buy one just to build one kayak. You should be able to find someone to do the cutting for you. If nothing else, check with your local high school. They usually have wood shops set up and might want to help you.
A circular saw is much cheaper than a table saw and can be used to do the same cuts as a table saw.
This is a dangerous tool. If you've never used one before get someone to show you how to use it safely. If it gets jammed, it kicks back and is liable to wound you. Find out about kickback and avoid it.
Gunwales herstellen
In this part you will be getting the gunwales ready for building the deck of the kayak. You will be shaping them and you will also be marking them for later installation of the deck beams. Finding the wood for the gunwales may take some time, but the actual work on the gunwales takes less than a day.

Material
You will need
- two 3/4 inch thick by 16 foot long boards anywhere from 2 to 3-12 inches wide
These two boards will form the gunwales which are the backbone of the kayak. - a piece of wood 1-3/4 inches wide by 3/4 inches thick by 5 feet long
You will cut this up for risers that go at the ends of the gunwales. - four each 1/4 inch dowels 36 inches long
Exact length doesn't matter as long as you have enough total length since you will be cutting these up.
Four dowels is more than enough for working with the gunwales.
You will be using the left over dowels for pegging the deckbeams to the gunwales. - about a dozen 1-1/2 inch long finish nails.
These are generally referred to as 4 penny nails.
You will need more later on so buy at least 4 dozen of them.
Werkzeuge
For this section you will need
- a hammer
- a drill
- a 15/64 inch drill bit
- a hand saw
- a block plane
- a pencil for marking
- a tape measure
- a combination square.
A pair of sawhorses will be handy for keeping the gunwales at a comfortable working height.
Vorgehen
Selecting gunwale lumber
For the gunwales you need two boards that are anywhere from 2 inches to 3-1/2 inches wide, 3/4 inches thick and 16 foot long. Both boards should have the same amount of flex. The easiest way to get identical flex is to cut both gunwale boards out of a 5-1/2 inch wide board. This will leave you with a piece of lumber that you can use for a keelson. When you get your 16 foot long boards, also allow for enough total width to cut two chine stringers and a keelson each of which should be an inch wide.
If you want to avoid a lot of sawing, you can try to find boards that are 3-1/2 inches wide and 16 feet long. This will push the final weight of your boat up to about 45 pounds, but it will be a rugged boat. If light weight is important to you, you'll have to do some sawing to get the 2 inch wide boards.
The wood for your gunwales should be some kind of soft wood like pine, spruce, or douglas fir. The wood should be free of knots and have straight grain. Softwoods are preferred over hardwoods like oak because they are lighter and because hardwoods with straight grain are hard to find in 16 foot lengths. For best results and highest price, get wood of a grade called CVG, which stands for clear vertical grain. Vertical grain assures uniform flexibility throughout and is subjecct to the least amount of warping over time. Clear means no knots.
If you want to build your boat with the wider 3-1/2 inch boards, these can have some knots as long as they are tight and small, under 1/2 inch. Two inch wide gunwales should not have any knots in them at all.
When you select gunwale boards, also make sure that they have roughly the same amount of flex. You can check for equal flex by supporting both ends of the boards and seeing that they sag the same amount in the middle. If flex is mismatched, try flipping one of the boards over. Sometimes they have more flex in one direction than the other. Flex in the two gunwale boards does not have to be absolutely the same but if the difference is too great, it will make it harder to get a symetrically shaped deck.
Nail the gunwale boards face to face
Once your gunwales are cut you will need to mark deck beam positions on the top edge and rib mortise positions on the bottom edge. To make sure that we mark both gunwales the same, we temporarily nail them together.
Put the gunwales face to face and nail them together leaving 1/4 inch of the nail heads sticking out so they can easily be pulled when we are done marking. Space nails roughly two feet apart. When you nail the board together make sure that the sides with the same amount of flex face each other. Also make sure that the ends of the boards line up exactly. If they don't you will be installing all your deck beams at an angle.
Image Notes
1. Leave enough of the head sticking out so you can pull the nails again later.
Image Notes
1. nail gunwale boards face to face with 4 penny finish nails spaced roughly two feet apart. Make
sure the edges of the gunwale boarde line up as well as the ends.
2. Ends must line up exactly or you will be in trouble later on.
3. Try to get the edges to line up reasonably well. Small amounts of curvature and waviness in the
edges will make them misalign here and there.
Mark the longitudinal center of your gunwales
Find the front to back center of the gunwales and mark it. Use a tape measure to find exact length of the gunwale boards since they aren't always exactly 16 foot long. You want to know the center of the gunwales since some of the deck beam locations will be in relation to the center. Run the center line around all 4 faces of the nailed together boards. Mark each face with a C for
center.
Mark bow and stern and up
Decide on which end of your gunwales should be the bow (front) and which edge should be up. You generally want the better looking edge to be at the top. Mark the bow and stern with arrows so you can keep track which is up and which is front. You will
be marking deck beam positions on the top edge of the boards and rib mortise positions on the bottom edge of the boards.
Once you work on the boat with a bow facing a certain direction, always keep it facing the same way so you don't get confused over which end is which.
Image Notes
1. The up arrow indicates the top edge and the forward arrow indicates the bow. Mark both sides so
you know which end you're on regardless of which side you're standing on.
Measure your body
Three of the deck beams in your kayak will double as a foot brace, a knee brace and a back rest. To get them in the right position, you need to measure your body. To take the measurements, sit against a wall with your legs outstretched before you. Make sure you are wearing the same kind of footwear you would have on while paddling because this will impact the measurements. You can measure on your own but it's easier with the help of a friend. The measurements you want are as
follows. Make sure you write them down somewhere.
Distance from your back to the back of your kneecaps. Your knee brace will be positioned right behind your kneecaps. Put a 1-1/2 inch wide board right behind your knee caps. Move it far enough back so that it doesn't feel uncomfortable when you press down on it.
Distance from your back to the balls of your feet. Sit with your heels together and the toes slightly outward.
Width across your feet at the balls of your feet. This measurement is mainly for people with feet
larger than size 11. Greenland boats are fairly narrow so you have to make sure your boat will be
wide enough at the foot brace for your feet to fit.
Height of your thighs behind your kneecaps. We need this measurement so we can make the knee brace
high enough for your thighs to fit under.
Image Notes
1. The helper does the measuring and recording.
2. Wear your kayaking shoes because they will influence how much room you need for your feet.
3. This piece of wood simulates the knee brace. It should sit right behind the knee caps. If you
place it too far back, your cockpit will be too small for you to get into.
4. This piece of wood simulates the backrest. All measurements are taken from the face of this
board foreward.
Image Notes
This is the distance from the back rest to the front of the knee brace. The knee brace should be
about an inch back of the knee caps, far back enough to be comfortable.
2. Backbrace to footbrace distance. Legs should be outstretched and feet tilted slightly forward.
It is better to get this distance a little too large than too small. If too small, your boat will
be cramped.
Image Notes
1. We show a gap here because we position the back brace slightly back of your back so you have
room to add some padding later on.
Transfer body measurments to the top edge of the gunwales
Now that you know how big your body is, you can mark where your backrest, foot brace and knee brace
should go. Deck beams will be 1-1/2 inches wide so we want to mark both the front and back edges of
the deck beam locations. If we only made one mark, we would likely get confused over which side of
the mark to put the deckbeam on. As you mark where these deckbeams will go, label them as well.
Label them on each gunwale since later you will be separating them.
Make a mark 17 inches back of the centerline you marked earlier. This will be the location of the
front edge of your back rest. Make another mark 1-1/2 inches back of that. Your back will be 15
inches back of the boat's longitudinal center. The extra two inches will give you enough room to
add some padding to the back brace or to install a back band to support your back while you're
paddling.
Take your back to kneebrace measurement and add 2 inches to it. Measure from the backbrace front
edge forward by this amount. This will be the front edge of your knee brace. Make another mark
1-1/2 inches back of that and label it knee brace.
Take the measurement from your back to the balls of your feet, add 2 inches and measure forward by
that amount from the back brace mark. Make another mark 1-1/2 inches forward of that. Label this
foot brace.
Image Notes
1. The bow is off to the left.
2. The stern is off to the right.
3. The x's indicate which side of the line the deck beams will go on.
4. We add two inches to these measurements because the back brace is two inches farther back than
your back to allow you to add padding at a later date.
Image Notes
1. We're actually looking at the bottom edge of the gunwales here, but we carried the markings for
the deck beams around all sides just so we can tell how the
deck beams will interact with the rib mortises.
2. These are rib mortise markings 3/4 inches wide although the ones we will be making will be an
inch wide.
Mark positions of the remaining deck beams
We have already marked the positions of three of our deck beams. Now we need to mark the positions
of the remaining deck beams. Do all the marking on the top edge of the gunwales.
Make a mark 24 inches from the bow and another 24 inches from the stern. Make another mark 1-1/2
inches toward the center of the gunwales. This will be the position of deck beams 1 and 11. Label
them on each gunwale.
Space deck beams 2 and 3 evenly between deck beams 1 and the footbrace which is deck beam 4. Space
deck beam 5 halfway between deck beams 4, the foot brace and deck beam 6, the knee brace. Space
deck beams 8, 9 and 10 evenly between deck beam 7, the back brace and deck beam 11.
Image Notes
1. This is the bow. The first deck beam is located 24 inches from the end.
Image Notes
1. We start numbering deck beams at the bow. Total number is 11.
2. This drawing shows a separate knee brace and masik. This setup is used only for very small
cockpits. We will have the masik and knee brace functions served by a single deck beam.
Mark rib mortise positions on the bottom edge of the deck beams
Mark rib mortises by two lines one inch apart. This will be the width of the rib mortise. Ribs will
be 3/4 inches wide. The mortise will be wider than the rib giving the rib some room to move which
it will do as the boat flexes. Tightly mortised ribs would have a tendency to shear off over time.
Start by marking a rib mortise 2 inches back of the back edge of the foot brace. Mark all rib
mortises on the bottom edge of the gunwales. Mark the next rib mortise 8 inches back of the front
edge of the first rib mortise. The reason for starting here is that you want to position these ribs
so they don't dig into the back of your heels (painful).
Space all the other rib mortises forward and backward of the first two mortises. Mortises should be
spaced 6 inches on center. That't not 6 inches between rib mortises, that's 6 inches between their
centers. Mark forward until the last rib mortise is 24 inches or less from the bow. Mark backward
until the last rib mortise is 24 inches or less from the stern.
Image Notes
1. Mark the locations of the rib mortises by two parallel lines spaced one inch apart. Put an x
between the lines to avoid confusion when you actually cut the mortises. This picture shows the
mortises at a later stage.
Cut bow and stern risers
The drawing below shows how you can get two risers out of each board by cutting it in half at a diagonal.
Dowel bow and stern risers to the gunwale ends
Dowel the bow and stern risers to the gunwale ends using 1/4 inch dowels. Use your 15/54 inch drill
to make the holes. Drill the holes at an angle to the vertical. This will lock in the risers. Don't
drill all holes at once. Drill one hole, pound in the dowel. Drill the next hole pound in the next
dowel and so on. Holes will be deeper the closer you get to the ends of the gunwales. Cut your
dowels to the depth of the hole. Use a piece of wire as a gage to find the depth of each hole.
Trim off any dowels sticking above the edge of the risers.
Image Notes
1. Drill dowel holes at the angles indicated. Number of dowels is suggested only. Sometimes we use
more.
2. note that overhang for the bow and stern is different. We will later cut off the corners. The
greater overhang at the bow will allow for a more gradual slope than at the stern.
Image Notes
1. Trim off any part of the dowel sticking up above the risers.
Image Notes
1. We used 4 dowels on the stern. Green marker makes the lines easy to see. The only downside with
marker is that you will see these lines through the translucent skin. If you don't like how this
looks, use a more subtle pencil.
Image Notes
1. A clamp keeps the riser aligned while we drill.
Image Notes
1. Score dowels by rolling a knife over them, then snap them off. This is easier than cutting with a saw.
Trim gunwale ends
Trim the bottom edge of the bow end at a 25 degree angle. Trim the bottom edge of the stern end of
the gunwales at a 30 degree angle. These angles are the angles at which the stem and stern boards
will be attached to the gunwales.
The stem slopes at a flatter angle than the stern.
Image Notes
1. This angle doesn't have to be exact but it should be in the ballpark.
Image Notes
1. Here's what the bow looks like after the bottom edge was cut off at a 25 degree angle. This will
also be the angle that the stem board intersects the waterline with.
Shape tops of the risers
Use a hand plane or spoke shave to shape the top edge of the risers to a slightly concave form so
they fair in nicely with the tops of the gunwales.
Cut the rib mortises
Now we're done with the tops of the gunwales and are ready to cut the rib mortises.
Rib mortises are 1 inch long, 1/4 inch wide and 1/2 inch deep and are centered on the bottom edge
of the gunwales. If you have a router and 1/4 inch bit, that is the fastest way to cut the
mortises. If you don't, drill a 1/4 inch hole on either end of the mortise and remove the wood
inbetween with a 1/4 inch chisel. Wear ear protection if you use a router.
Image Notes
1. Here's what the rib mortises look like routed out. Note that we ran the router
up to the center of the marks. Running them over a little is not harmful since they are oversized
in any case. However, try to aim for one inch long slots.
Image Notes
1. Routers scream like jet engines. Be sure to wear hearing protection. They kick out a lot of dust
as well so wear glasses.
2. The fence on the router centers the bit on the center of the gunwale. We have to switch over to
do the other gunwale. Some of the nail heads sticking out of
the gunwales may interfere with the fence. If they do, pull them.
Mark the ends of the gunwales for planing
The ends of the gunwales will come together at an angle, so you want to plane them so they have
some flat surface where they come together. You will mark the wood that you want to plane off. The
diagram below shows how to mark them.
Image Notes
1. The inside faces are the faces we will be planing.
Image Notes
1. Run the line down the middle of each gunwale end. We will be planing off the shaded face.
Separate the gunwales
Now it's time to pull all the nails and separate the two gunwales so we can plane the inside faces
of the gunwale ends. We need to do one more marking step once the nails are removed. See the photo
below for how to do the marking.
Image Notes
1. We're using a straight edge to draw a line one inch in from the sloped bottom inside edge of the
gunwales.
Plane the ends of the gunwales
Remove the marked wood with a hand plane. See the picture for what this looks like.
Image Notes
1. And this is what the planed edges look like when we're done.
Image Notes
1. We're removing the wood up to the center line on the end and one inch in on the face.
We are now done with the gunwales and ready to build the deck.
Deck bauen
Lorem ipsum dolor sit amet, consectetuer adipiscing elit. Ut commodo pretium nisl. Integer sit amet lectus. Nam suscipit magna nec nunc. Maecenas eros ipsum, malesuada at, malesuada a, ultricies dignissim, justo. Mauris gravida dui eget elit.
Kiel, Bug und Heck hinzufügen
Lorem ipsum dolor sit amet, consectetuer adipiscing elit. Ut commodo pretium nisl. Integer sit amet lectus. Nam suscipit magna nec nunc. Maecenas eros ipsum, malesuada at, malesuada a, ultricies dignissim, justo. Mauris gravida dui eget elit.
Rippen hinzufügen
Lorem ipsum dolor sit amet, consectetuer adipiscing elit. Ut commodo pretium nisl. Integer sit amet lectus. Nam suscipit magna nec nunc. Maecenas eros ipsum, malesuada at, malesuada a, ultricies dignissim, justo. Mauris gravida dui eget elit.
Rumpf- und Deck-Verbinder hinzufügen
Lorem ipsum dolor sit amet, consectetuer adipiscing elit. Ut commodo pretium nisl. Integer sit amet lectus. Nam suscipit magna nec nunc. Maecenas eros ipsum, malesuada at, malesuada a, ultricies dignissim, justo. Mauris gravida dui eget elit.
Haut aufnähen und lackieren
Lorem ipsum dolor sit amet, consectetuer adipiscing elit. Ut commodo pretium nisl. Integer sit amet lectus. Nam suscipit magna nec nunc. Maecenas eros ipsum, malesuada at, malesuada a, ultricies dignissim, justo. Mauris gravida dui eget elit.
Recommend this page to others